Hardware Installation

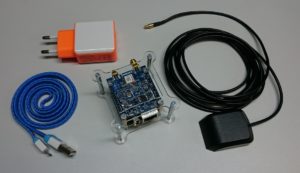
The nanoADS-B set comes with nanoADS-B receiver with plugged in SD card, power supply and cable, GPS antenna with 3m cable and ADS-B antenna with 3m cable. The antenna cables differ in the connector type, so there no mistake can be done when connecting them to the receiver.
Commissioning
The GPS and ADS-B antenna need to placed under open sky. For best results with ADS-B it is important that the antenna is placed as high as possible and has free view in all direction.
The antenna connectors have to be connected firmly to nanoADS-B. The device is powered through the micro USB cable and a power adapter. nanoADS-B consumes about 500mA@5V in average. Still a good 2A power supply is needed to cover load peaks. Powering nanoADS-B from PC by USB port may result in unstable behavior. nanoADS-B needs to be connected by a LAN cable to a network router or directly into the LAN port of a PC.
Operation
The device is power on by plugging in the USB cable connected to USB power supply. During boot up the green and blue LED on the lower processor will board blink heavily. After the device has booted into Linux the LEDs are assigned with the following functions:
- Green LED: CPU activity (usually on at runtime because one core is busy doing data decoding)
- Blue LED: Disk activity (usually off at runtime)

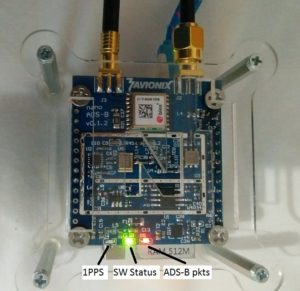
On top board there are 3 LEDs.
- The yellow LED indicates the 1 pulse per second signal from the GPS receiver. It will start blinking as soon the GPS receiver got a fix.
- The green LED indicates that the decoding and data distribution process is running and working normally.
- The red LED blinks with every received Mode-S packet. If it does not blink please check connection to antenna.
nanoADS-B is using a read-only mounted file system and can be safely powered off at any time.
Network Connection
To connect to the device with a PC it needs to be connected to network. There are several alternatives to set up the connection.
LAN connection to network router
The easiest way is to use a LAN cable and connect it to the network router. The device is configured to obtain an IP address vie DHCP. The assigned IP can be looked up in a status page in the network router. If this is not possible then the tool nanoADSBscanner is provided to look up the IP address from LAN and WiFi interface. The tool requires Java to be installed on a computer located in the same network than nanoADS-B. nanoADS-B is sending out its current IP settings for ETH0 and WLAN0 interfaces on a UDP multicast port in 10 second interval. For WLAN0 additionally link quality details are shown. A sample output is shown below.
eth0 Link encap:Ethernet HWaddr 02:86:56:00:00:05
 UP BROADCAST MULTICAST MTU:1500 Metric:1
 RX packets:0 errors:0 dropped:0 overruns:0 frame:0
 TX packets:0 errors:0 dropped:0 overruns:0 carrier:0
 collisions:0 txqueuelen:1000
 RX bytes:0 (0.0 B) TX bytes:0 (0.0 B)

wlan0 Link encap:Ethernet HWaddr 20:e8:16:00:b4:c4
 inet addr:192.168.1.178 Bcast:192.168.1.255 Mask:255.255.255.0
 inet6 addr: fe80::22e8:16ff:fe00:b4c4/64 Scope:Link
 UP BROADCAST RUNNING MULTICAST MTU:1500 Metric:1
 RX packets:7017 errors:0 dropped:0 overruns:0 frame:0
 TX packets:5709 errors:0 dropped:0 overruns:0 carrier:0
 collisions:0 txqueuelen:1000
 RX bytes:603815 (603.8 KB) TX bytes:994723 (994.7 KB)

wlan0 IEEE 802.11 ESSID:"xxxxxxxxxx"
 Mode:Managed Frequency:2.427 GHz Access Point: 90:F6:52:DE:3D:D9
 Bit Rate=52 Mb/s Tx-Power=20 dBm
 Retry short limit:7 RTS thr:off Fragment thr:off
 Encryption key:off
 Power Management:off
 Link Quality=54/70 Signal level=-56 dBm
 Rx invalid nwid:0 Rx invalid crypt:0 Rx invalid frag:0
 Tx excessive retries:5 Invalid misc:1627 Missed beacon:0
If this output is not received then nanoADS-B is not correctly connected to local network or router does not provide IP address by DHCP.
As soon as the IP address of the device is known it is possible to connect by a web browser to the address.
Direct LAN connection
As a fallback nanoADS-B has always the virtual IP address 10.11.12.13 configured to the LAN port. nanoADS-B can be connected with a LAN cable directly to a computer. The IP address of the computer for the LAN port needs to be configured to a static IP address in the same range, eg. 10.11.12.12. Connecting with a web browser to http://10.11.12.13 opens the openAir web application.
